August 15, 2010

Full Steampunk Ahead


Share/Bookmark


The new jewelry trend that you have surely noticed by now is referred to as " SteamPunk" or "Industrial Chic". If you do not think that you know what this style is, you will... once you know the components found in the steampunk designs.


The parts and pieces that make up this style are just that: sections and elements of other items. Steampunk has characteristics of being industrial, quirky, uncommon, unusual, mysterious and interesting to the point of curious and comical. This style surprises viewers of the unexpected elements and highlights a diversity of "vintage charm".


The style includes but is not limited to the inclusion of items such as gears, springs, watch innards, old typewriter keys, buttons, rhinestones, hardware nuts, bolts, washers, wire, old photos, partial watch plate connectors, collectible odds and ends. Miscellaneous items that are found in a junk drawer or old tool box can be used in this art for example; old keys, charms, toy parts, dice, pottery shards, shells, lucite beads, antique tone beads, bottle caps, and loops. Basically, anything that has a vintage or antique feel to it is suitable for an authentic steampunk creation.


Steampunk style should relay a thought-provoking attitude, and a concept capturing essence of age and history. The color scheme is usually from the variety of metals used. It is an over-all eclectic look that embodies funk and mechanics.


Although the look may seem to be a little rough around the edges, that is the draw of this style. The main concerns from the artist in creating a steampunk design is obtaining a pleasing arrangement that is balanced in color and visual weight.


So, tackle your junk drawer(s) to unveil some miscellaneous treasures to be used as elements in your next creation in the steampunk fashion and popular-culture phenomenon. Some artists, like Club Creative Studio will gladly consider using your collection of "junk" to create a unique custom signature piece for you. Although this is not a "new" idea, as the steampunk movement has been around since 1987, you can place your own personal twists in the designs you create, or allow others to create for you in this wonderful style we call steampunk.

August 14, 2010

Tools of My Trade


Share/Bookmark


There are tools to my trade. Some tools are specific to the jewelry making profession, others are just items that I have found to be helpful and may seem odd to use. The photo above is a range of hand held tools that I use everyday. They are color coded and I usually know which one I need to pick up by either the color of the handle or the location of the tool as I place and replace it onto the work table surface. I'd like to share what each tool is for and comment on them as well.

Starting from left to right:
Wire Cutter (green handle). A wire cutter can be purchased in many different types of stores, a jewelry/bead store, a floral supply store, a "do- it-yourself" home improvement store, a craft store, a tool store, even a dollar store. They are not very expensive and so they can be resharpened or replaced as needed. I cut wire often and the gage of wire is not always the same. My cutters go dull quickly but, it is a must to have one on hand to cut any type of wire, nylon string from packaging, or even cut the end of a metal charm off. It is the number one tool that I use and need often.

Flush Cutter (bright green handle). This is a type of wire cutter but, the cutting jaws are angled for a more accurate cut. This cutter gets "flush" to the wire you are cutting and it is easy to place and see exactly where you want to cut.

Chain Nose Pliers (red handle). The pliers' jaws are flat on the inside and rounded on the outside. The flat surface creates right angle bends in wire. The rounded outside makes rounded bends. Their tapered point allows me to work in tight places. Pliers' tips are strong and solid foundation to twist or hold wire on one end.

Crimp Pliers (blue handle). Crimping pliers are specialty pliers that have two grooves machined into the jaws and are made to crush and close (fold over) very small crimp beads or tubes. Crimp pliers come in a few different sizes based on the size of crimp beads or tubes used. The one above is a "micro crimper" that crimps or secures smaller crimp beads.

Round Nose Pliers ( lavender handle). The name refers to the shape of the pliers' jaws. I use the round nose to create loops and creative curves in the wire. Most of the round nose pliers have a tapered point. That allows me to vary the size of any loop or bend, also making them consistent in size if looped or bent in the same location of the tip.

Round Nose Pliers (pink handle) is a smaller version of the lavender handle tool. The loops and curves formed with this are much more tight and smaller. Both tools are used interchangeably but they can also be used for a specific bend.

The tools that are not marketed specifically for the jewelry profession and are merely "invented" will be the topic of another post but, for now I did include one item (pictured) that I use on a regular basis that is not common on shelves of beads shops as a tool. I discovered it by playing a board game!
The board game of a jewelry artist's choice should be SCRABBLE. Well...until there are a few missing wooden letter docks, that is! The length of the grooved wooden plank that usually holds the Scrabble game letters (first item left to right in photo) happens to also be the average length of a person's wrist, for a bracelet. Thus, making for a great design shelf for planning and creating a bracelet. The beads can be placed in the desired order to be strung and it will end up measuring seven inches. You can adjust the length by ending the clasp at the end or just before it reaches the end of the mini shelf.
An Awl (second item left to right above) is used for making sure a hole in a bead is uniform and able to allow a wire or string to move completely through the entire bead. For snug fits, the awl makes sure that the pointed end helps ribbons and string move through a bead hole with out snags and smoothly.
Ruler The ruler is used at the beginning and at the end of my creations. In the beginning, I have an idea of the length I want the creation to end up being. Especially if it is a custom piece, the length is very important to get correct. It is always important to allow for extra wire in the beginning so that there is adequate wire for folding over at the ends. When I use links for a connection, it is sometimes good to incorporate extra or expendable options at the ends as well.
Needle Tool This is a tool with a very sharp metal end and the shaft is like a file. It is used to smooth out the inside of a bead hole and can also be used to poke a rough spot out of a metal charm, or make a hole bigger in a metal charm.
Flat Nose Pliers This is used like bent chain nose pliers (not pictured). The bent nose pliers have an end like a hook that grip wire and material in hard-to-reach-places. The flat nose pliers can also do that but, the jaws are entirely flat and smooth and can be sued to grip, bend, and flatten wire without marking it.
Determining your level of projects considers basic knowledge of some tools, materials and beads. The intermediate level person has skills that are working knowledge of basic techniques, tools, and materials. An advanced skill level has experience in technique or medium being used. An advanced skill level person accepts challenges and are looking to push beyond existing skills. Club Creative Studio finds that growth is evident and the moto: Be Creative Everyday is key.

August 06, 2010

I'd Like Some Cheese With My Whine!


Share/Bookmark
I love a good creative challenge. I also love when others help me to overcome a task that is ridden with questions. Recently, a friend (Jennifer) collected wine bottle corks and presented me with the challenge at hand. I did not whine for long.
How would I approach this magic trick? My mind is racing with a few ideas on how to tackle the first steps. I have found that the pure corks work best for cutting and I was able to smooth the edges with an ordinary finger nail file.
After a few trials and errors and after I was able to decide the best method/tool to use to poke a hole in the center of a cork, so that it broke as smoothly as possible. I was able to celebrate knowing it would all come together nicely. The necklace strand is made with simple wooden beads and spaced with a single seed bead.
The pendant section is a portion of one cork that is flanked with glass round beads and wooden disks dyed in the color green. I used silver and green tone wire as wrapped accents around the cork to add a touch of flair and funk. Since this is the first attempt, I am excited to see what else I can create. I would like to use the remaining pure cork stops for jewelry and then suggest that a cork wreath be made with the plastic coated corks, as to not waste them but, use to further her wine theme in the home as a decorative item- something different to appreciate with wine and cheese!
The second project also features a portion of a cork as well for the focal bead. I placed a brass spacer disk on top to make it look a bit industrial and rugged. The flowers are decorative brads that I often use in the packaging of Club Creative Studio earrings and it is also represented in our logo design. The brads are secured into the side of the cork with the metal point and a dot of jewelry adhesive. Metal butterfly charms and the hand-torched glass dot beads along with the peach colored ceramic beads finish out the entire look and feel of this necklace. It is unique and as always one-of-a-kind.

Thanks for the challenge and I will keep working on improvements and using ideas that are both fun and functional.


July 30, 2010

Artists...might be strange after-all


Share/Bookmark
You know you are an artist when...you go out and you are always stopping to notice the things around you.

I hate taking a dog out for a walk. Any type dog, on any length of a walk. I like the outdoors, I don't mind a stroll around the block. I HATE a constant stop and go motion of walking a dog though. If a dog likes to take one step, then stops, then takes another step, stop, sniff, take another step, stop, sniff, look around, go, stop etc. I go crazy! Get the picture?


However, if someone does not know me and watches me walk with my family...anywhere...I act like that same dog that I hate. I am the one that has to always take a small step, look around, take a photo, go in closer for another look, stop to feel, appreciate the composition of an object and tag way behind. No one likes to wait for me. Everyone is embarrassed to see me take a photo of something that is seemingly so ordinary. My family is sort of used to me after all of these years. What I might find interesting will never hold the same interest to them. So, they chalk it up to the "Artist" in me and leave it at that. Even if I explain why something has caught my eye, the experience is in the eye of the beholder.


Artists have a different mind-set. And I think that instead of explaining that fact, I will just continue to be me and have others continue to wonder what it is that makes me think that things like taking photos in the car while going through the car wash is so darn visually interesting because of the patterns the water and soap combine to make on the windows!

Giving A Hand-Made Gift


Share/Bookmark
Club Creative Studio offers solutions to a person who is looking to give a gift that has hand-made and unique qualities.

It is a tradition for some to recognize a certain time of the year for a majority of their gift-giving ventures to occur. But, I am writing to tell you something that you may or may not know...gift-giving has more than a season. Everyday in itself is a reason to give someone a gift. The gift can be given to yourself as well as other important persons in your life. We generally give gifts to people who have value to us.

When I sit down to design beads or jewelry, I really like to plan and I think of what someone may like. I plan the colors and the designs with the general public in mind. I may also have a specific custom request desires in mind or I may have a general look in mind that I create to appeal to an established fan or someone not familiar with our work yet.

The main reason of TRADITION is what we may be most familiar with in terms of why we buy something for someone.
It may be your tradition to give a gift for other reasons or to give a gift for no apparent reason. Both great habits to have.

Gift giving and giving something that is hand-made in particular provides an opportunity for one to creatively affirm personal bonds to their special friends or to people who appreciate the value of owning something unique. For me as an artist, it is a way of sharing my skills with others. I love to give gifts of my designs and I love when others do so as well. When you give a hand-made gift, you indicate that you are willing to put in the time and efforts for that person. If you give art as a gift that was created by an artist, you share support of that artist that created the unique item for your gift-giving occasion.

You may have been on the receiving end of being a customer who has been gifted a token of appreciation. Maybe you have received a promotional gift from a business in appreciation of your support. Companies share with employees for valuable contributions at the workplace. It is a great reason to share in the gift-giving spirit, especially if not expected.

Gifts also mark milestones like birthdays, anniversaries, special calender holidays, religiously recognized days, and other such occasions like special events including graduations, retirements, promotions, etc. Gifts are given for accomplishments. Winning the spelling bee, breaking a personal best record or reaching a long fought after goal. A gift is a great way to reward behavior. An additional opportunity for gift-giving is to give a gift as A CAUSE. We may be fortunate to have all we need and a comfortable life but, what about those who are not as fortunate? We can use the gift- giving occasion to bring ease to someone in a difficult situation.

Continue to have the gift-giving spirit. Your actions do not need to be extravagant or costly. Online shopping makes this option very convenient now-a-days because the payment options are easy, and the delivery can be done quickly for you. Club Creative Studio also considers the importance of their product presentation. We supply the added special touch by including a hand made, one-of-a-kind, protective fabric pouch for the safe-keeping of your purchased art. The gift bags that hold your treasured hand-made beaded item is also color coordinated for your completed visual gift.

The photo attached to this article is an illustration of a recent gift I made for a friend moving away from my neighborhood. The sea glass used was a valuable item I used to in turn make her a beautiful gift by which she may recall her times spent living by the east coast. Farewell and following seas to my friend and her family Keep in touch!


I Make it, You Love It, You Wear It


Share/Bookmark
This is a great example of a necklace made from Club Creative Studio that would look gorgeous with a lacy, white top for instance. Because it is dotted with a splash of colorful beads and sparkle sequins, it gives punch to a simple over-all look.

Wearing "theme jewelry" (as pictured below) gives one a festive and purposeful feeling to their fashion statement. Here, there is no question in your mind that the person wearing this appreciates ocean critters and they want you to know that!


To accent a top like a flowing tunic, there is a matching style that seems to compliment very well; anything with length.
When you look at jewelry, you get an instant reaction. Most of the time you decide right away if something fits your taste or does not. When I created this piece, I should have noted my personal mood. To me, this is reflective of a playful style and feel. It would look great wearing something casual, funky and fun with a go-with -the-flow evoked feeling.
A big-bead necklace may add an extra dose of color to a patterned wrap top. The accent color often blends with a pattern even it it is a "busy look" in your mind. The chunk-style necklace is always fun to wear because it shows a bit of boldness.


There are many opinions in the fashion world. We all draw upon what the experts suggest on the run-way and from what we end up seeing in the department stores we frequent. The fact remains that we buy what we LOVE. Generally speaking, we LOVE what is comfortable and eye-pleasing. Use the few ideas I mentioned with each of our photo examples. You will allow yourself to test if a certain style works for you, and agrees with your own personal taste in wearing or sharing our jewelry.


Thank you for wearing and sharing our Art That Sets You Apart!

June 17, 2010

Store It... Don't Stuff It


Share/Bookmark

It is really easy for those who frequent craft stores to get home after their purchase and be nothing but discouraged. It is not that they are unhappy with the treasures they have purchased, it is in the realization that they do not have the same great display shelves or storage capacity a store has. Wouldn't we love aisles, bins, baskets, shelves, rotating displays, hooks, etc. in our home craft areas? The problem for many is that we "stuff" our stuff, and don't "store" what we got from the store. To be productive, you need your supplies readily available.

IT TAKES TIME TO MAKE TIME:
Taking initial time to be organized in your work space will save you time for your creations later. If you are organized at the start of a project, you will have quick access to your items. You will then not waste time trying to remember where certain items are. Color codes, or file and label systems can work for just about any type of craft you need to manage. Once, instead of labeling many mini drawers with individual stickers, I thought that I would just memorize where items were. That was possible for me to do but, when I was tired, the memory wasn't as sharp. I ended up wasting more time trying to recall because it was not a consistent quick process.

BE CAREFUL TO CARE:
If you take time to be organized in your workspace, your items will have a greater chance of staying in a new or working condition longer. Take time to care for items by storing them in a proper manner. Correct storage and containers allow you to potentially avoid situations dealing with broken, torn, dulling, drying, fading, misplaced, or hazardous materials. It is a safe practice to safeguard your investment in your supplies.

RECYCLED REMEDIES:
It is a fact that if you have a passion for a particular creative outlet...you want supplies, need supplies, have supplies, collect supplies, hoard supplies and store supplies. Once we buy supplies, we are not really in the mood to spend additional funds on storage containers. We would much rather spend that money saved on more supplies! I have invested in a few inexpensive methods for my bead storage system. Some of my storage containers are also recycled and that saves on the environment as well. I have taken a few photos to share some of my easy solutions. Maybe it will work for you as well to adopt or adapt the same methods for your storage challenges.

MY METHODS-MY MADNESS:
1. After the spice rack was empty, I converted it into a revolving caddy for the items that I use on a regular basis an need close at hand. The clear containers allow me to see exactly what I need. The revolution of the stand allows me to grab a container quickly. The label is also on the top so I can read what is on the outer side of the caddy with ease.

2. Speaking of spices...I often use whole cloves in my wreath crafts and in home-made potpourri, so when I buy that supply and use it up, I wash the container it came in and take the label off. The one ounce container is great for small items with a low count. The BEST part of it is when I open the lids, I can usually still get a slight scent of cloves! I label the top to identify.

3. The initial idea with the small round favor tins was to hot glue the magnetic strips on the back of that container and then secure the see-through lid on and place it upon a metal sheet directly on my wall. The only problem with that idea was that my items were generally heavier than what the container could hold and it slipped down or fell often. Plan "B" is what I still use today instead. The same bead-filled magnetic bottom tins grasp onto an old cookie sheet. Each sheet holds 40 containers and they stack.

4. Many times I use zip-lock baggies. The snack size are great to grab onto if the content amount is small or if you want to group something by colors quickly. Large quart sized baggies are great for protecting larger items and the larger sizes can even protect papers from liquids.

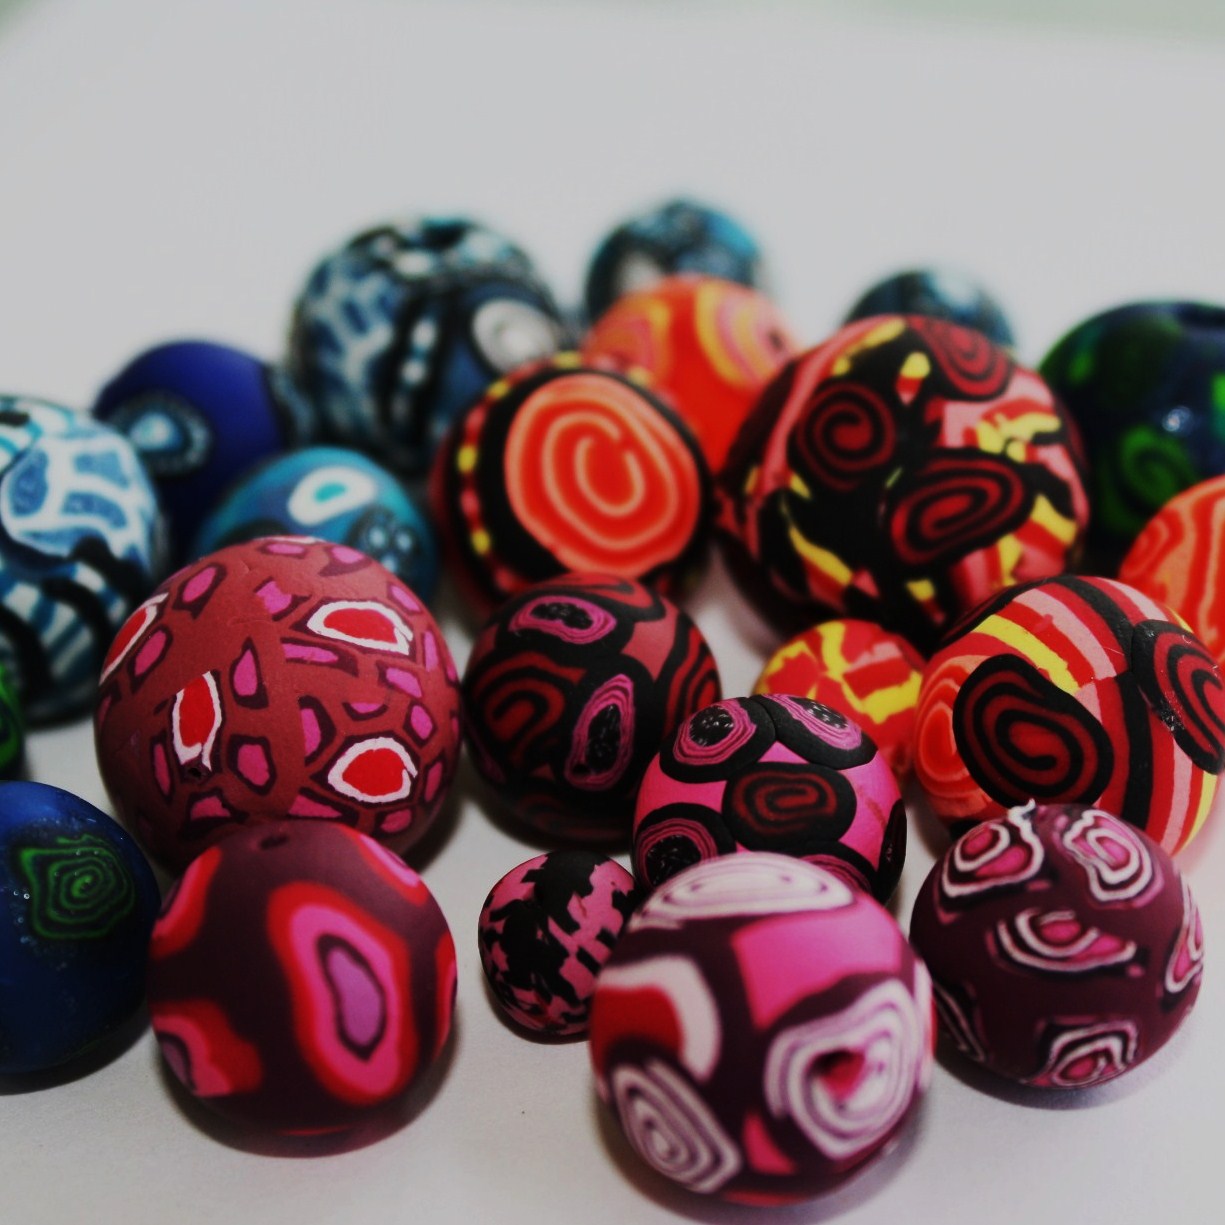
5. The image that you see with the strung beads is a pipe cleaner with beads on a small section, the ends curled inward. This is my way of organizing my groups of hand-rolled clay beads. I can grab any strand quickly, compare it next to a different bead, remove and replace it easily and best of all see at a glance how many I have to work with. This is important for me since my beads are in limited quantities and I have to plan for the amount I can use.

Maybe you or someone you know uses or stores beads or other small objects. Share this site with them for the tips. I challenge you to adopt, adapt, or announce your storage solutions in a comment to this post. Happy housekeeping!

www.clubcreativestudio.com